
When it comes to deriving drawer heights for a chest of drawers, there are several tried and true proportioning techniques that can be relied upon to create a piece of furniture that is pleasing to the eye. The simplest approach is a uniform progression in which each drawer has the same height. This approach doesn’t require much figuring and manages to produce a piece that is functional although perhaps not as elegantly proportioned as some would prefer. Another technique is a Fibonacci series progression in which the height of each drawer is based on the sum of the height of the two preceding drawers (after the first two drawers). So, if the first two drawer heights were 2″ and 3″ respectively, the succeeding drawers would be 5″, 8″, 11″, 19″, and so on. This technique, which is based on the classic golden ratio (each drawer is 1.618 times higher than the preceding one), produces drawers that rapidly increase in height. This effect works well for certain types of furniture such as a Shaker-style chest of drawers with small drawers at top and relatively large cabinet doors at the bottom. However, if you’re interested in building a general purpose chest of drawers in which all the drawers gradually vary in height, the Fibonacci series progression may not be the best choice.
Three other common proportioning techniques, and the ones handled by the Drawer Sizer, are arithmetic progression, geometric progression, and Hambridge progression. Each is described below.
Arithmetic Progression
With arithmetic progression, the heights of successive drawer faces differ by a constant amount or “increment”. For example, if the height of the top drawer is 6″ and the increment is 1″, successive drawer heights would be 7″, 8″, 9″, 10″, and so on. Many people prefer to use an increment that is equal to the thickness of the drawer dividers – typically 3/4″ or 1″. This results in a nicely proportioned series of drawers and an eye-pleasing piece of furniture. Note that if the increment is set to 0, this produces a uniform progression in that all the drawers have the same height.
Arithmetic progression is fairly straightforward, especially when you already have values in mind for the height of the top drawer, the number of drawers, and the height increment. This scenario represents option 1 in the Drawer Sizer. It gets a bit trickier when you have a certain drawer space to fill but don’t have fixed values for the increment, the top drawer height, or the number of drawers (options 2-4). That’s where the Draw Sizer can help out because it enables you to quickly try out various combinations of parameters to see which looks best to your eye.
Geometric Progression
With geometric progression, drawer heights increase by a constant multiplicative factor such that the ratio of consecutive drawer heights is the same. Drawer 1 is to drawer 2 as drawer 2 is to drawer 3, and so on. In other words, each drawer is R times higher than the one above it, where R is the common ratio of the progression. For example, if the height of the top drawer is 4″ and the common ratio is 2, the heights of the next four successive drawers are 8″, 16″, 32″, and 64″. Using a more realistic ratio of 1.2, the drawer heights would be 4.8″, 5.7″, 6.9″, and 8.3″.
A geometric progression of drawer heights may be quite similar to an arithmetic progression depending on the choice of sizing parameters. The images below illustrate this. The first image depicts a chest of drawers created using an arithmetic progression with an increment of 1.4″. It looks quite similar to the second chest of drawers designed using geometric progression with a relatively tame common ratio of 1.2. However, when the ratio is bumped up to 1.5, the heights increase in size much more drastically resulting in the unit shown in the rightmost picture. The lesson here is that you can use either proportioning method to design a nice looking set of drawers – just be careful in your selection of sizing parameters. Note that a geometric ratio of 1.618 represents a Fibonacci series progression.
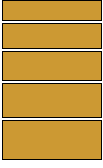 Arithmetic, incr=1.4 |
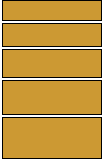 Geometric, ratio=1.2 |
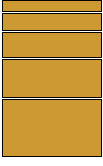 Geometric, ratio=1.5 |
Hambridge Progression
With the Hambridge technique, a reference square is first formed whose width is equal to the width of the drawer face. Picture this square positioned underneath the drawer unit. A series of “root” rectangles are then progressively formed in which the length of each rectangle equals the square root of the sum of squared width plus squared length of the previous rectangle. In other words, the length of each rectangle equals the diagonal of the previous rectangle (the reference square represents the first rectangle).
If we assume a width of 1, the first rectangle length is the square root of two (1.41), the second is the square root of 3 (1.73), the third is the square root of 4 (2), and so on. To get the width of a particular rectangle, you subtract the length of the previous rectangle from the length of the rectangle of interest. In designing a chest of drawers, the rectangle width would represent the height of each drawer.
This all makes a lot more sense if you have diagrams to guide you through the process (see recommended reading below). But, simply put, drawer heights are computed as follows:
The bottom drawer has a height of [(square root of 2) – 1] times the
drawer width.
The second drawer from the bottom has a height of [(square root of 3) – (square root of 2)] times drawer width.
The nth drawer has a height of [(square root of n+1) – (square root of n)] times drawer width.
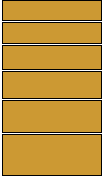
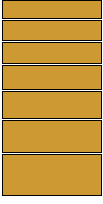
One of the interesting aspects of Hambridge proportioning is that the change in progressive drawer sizes tends to level out after 6 drawers or so. If you go much beyond 6 drawers, the drawers may look a bit “compressed” in height as can be seen in the images below.
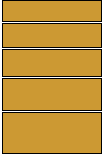 Hambridge – 5 drawers |
 Hambridge – 6 drawers |
 Hambridge – 7 drawers |
Which Method is Best?
With all these proportioning methods to choose from, it can be difficult deciding which one to use when designing a dresser unit. If the goal is to build a functional unit in which the drawers are roughly the same size – or increase very gradually in size – and you aren’t overly concerned about appeasing the golden rectangle gods, the arithmetic progression method with an increment between 1″ to 2″ is probably the easiest. The same effect can be achieved using geometric progression with a ratio of 1.1 to 1.2 or so. If you like the Fibonacci look in which the drawers increase rapidly in height, the geometric progression with a ratio of 1.6 might be your meal ticket. If you’re looking for a nicely graduated set of drawers that are in harmony with the width of the unit, the Hambridge method is hard to beat. It also offers simplicity of use – only three inputs are required – because of its mathematical underpinnings.
Recommended Reading:
The book Measure Twice Cut Once by Jim Tolpin describes each of the proportioning techniques mentioned here. It also include a drafting method for generating a Hambridge progression using a scale drawing and a compass. The method involves swinging a series of arcs with the compass to establish the height of each drawer. Working with the geometry in this manner makes it easier to grasp the underlying math.
Designing Furniture: From Concept to Shop Drawing : A Practical Guide by Seth Stem and Laura Tringali also provides a good overview of Hambridge proportioning as well as furniture proportioning systems in general. Note that this book is now of out of print but you may be able to borrow a copy from your local library.