
Shellac is a multi-talented finishing material: Not only does it provide a beautiful top finish but it’s also an effective sanding sealer and functions well as a barrier coat between dissimilar finishes. It also dries quickly, is easily repairable, and is non-toxic when dry. Why don’t we use this stuff more often??
The thing with shellac is that it has a fairly limited shelf life. After about 12 months, a premixed shellac/alcohol finish can no longer be relied upon to dry completely, resulting in a tacky, soft finish. And finishes applied on top of the shellac may wrinkle. The solution to this minor dilemma is to mix up a fresh batch of shellac on an as-needed basis so you only mix what you need to use.
I get the sense that many woodworkers are somewhat intimidated or at least put off by the thought of mixing their own shellac. We’re used to buying a can of finish that’s ready to go after a little bit of mixing. Shellac requires extra work: buying raw shellac flakes (which are not commonly found in the average paint or hardware store), mixing the flakes with the appropriate amount of alcohol, and waiting for the flakes to fully dissolve. And then there’s the whole shellac terminology thing: 1-pound cut, 2-pound cut, waxed, dewaxed, spit coat, etc. It can certainly be confusing to a novice.
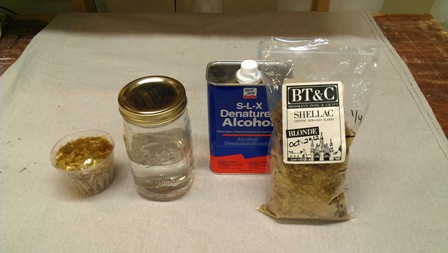
Shellac flakes + alcohol = shellac finish
I’m hear to tell you that once you get past the strange terminology associated with shellac and pick up the raw materials, it’s a piece of cake to crank out your own batch of shellac finish. And once you’ve done it, you’ll wonder why you didn’t do it sooner.
The first step is to purchase dry shellac flakes. As mentioned earlier, these are not commonly found in your local paint or hardware store so buying them online is generally the best bet. The flakes pictured here are Brooklyn Tool and Craft dewaxed blonde flakes which can be purchased from Woodcraft for about $30. The flakes come in 1 pound re-sealable plastic bags which is a good size for those of us with occasional shellac needs. One bag is enough to make two quarts of a 2-lb cut shellac mix.
Shellac naturally contains wax but I prefer to buy dewaxed flakes because they provide a harder finish with less likelihood of problems when other finishes such as lacquer or varnish are applied on top of the shellac.
The shellac flakes are mixed with alcohol to produce a liquid finish. Although any type of alcohol will suffice, denatured alcohol is commonly used. This is basically ethanol that has been treated with chemicals to make it unsafe for human consumption. The ratio of flakes to alcohol determines the “cut” of the finish. A 2-lb cut is 2 pounds of flakes in 1 gallon of alcohol, a 1-lb cut is 1 pound of flakes in 1 gallon of alcohol, and so on. A 2-lb cut is a good general purpose mixture to keep around for wood finishing purposes. It can easily be diluted with an equal amount of alcohol to produce a 1-lb cut for use as a base coat or sanding sealer or kept at full strength for intermediate and top finish coats.
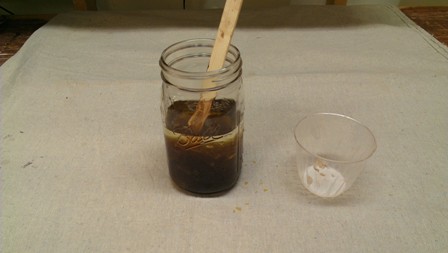
Mix shellac flakes until they disssolve
A gallon of 2-lb cut shellac is a lot to mix at one time so I prefer to mix up a smaller batch from a 1/4 pound of flakes and 1 pint of alcohol. What to do if you don’t have a precise enough scale to measure out the correct amount of flakes? I just use a ruler to divide the 1 pound bag into four approximately equal areas and mark each 1/4 pound increment on the outside of the bag with a permanent marker. This may not result in an exact 2-lb cut but this aint exactly rocket science either. I don’t think a furniture finish will be noticeably less effective if it’s made from a “1.85-lb” cut rather than a 2-lb cut.
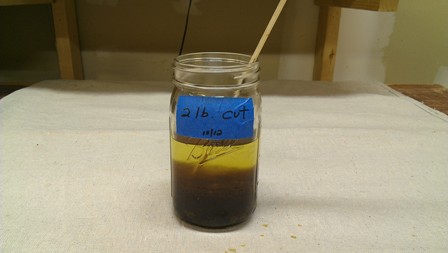
2 lb cut shellac ready to use
As far as the actual mixing of the shellac, I pour the flakes into a glass container and then pour the alcohol on top. Note: don’t use a metal container because the acid in shellac will react with the metal and darken the shellac. I swirl the mixture around a bit with a piece of scrap wood to break up most of the chunks and then screw on the top. I give the container an occasional shake over the next 1 to 2 hours and then once more the next day. I’ll also shake it right before using the finish to dissolve any flakes that may have settled to the bottom. Once the flakes are fully dissolved, I strain the mix through a paint strainer or cheese cloth into another jar to filter out any impurities (such as left-over lac bug parts). I screw the lid onto the jar and mark the date on the side of the jar to know when the shellac has reached its expiration date. After that, I’m ready for a good shellacking…