
There’s something screwy going on here!
Unless you’re doing rough construction with soft woods, a pilot hole is generally required when inserting a wood screw. A pilot hole makes it easier to install the screw in hard materials such as maple and also prevents the wood from splitting – especially when the screw is near the end or edge of the board. The harder the wood, the longer and thicker the screw, the more important it is to drill a pilot hole. The ideal pilot hole allows the wood screw to freely slide into the top board while securely gripping the wood in the bottom board. It should also have a conical-shaped countersink at the top so the wood screw lies flat on the wood surface.
Specialty countersink-pilot hole bits are available that drill pilot holes and countersinks in one step. With these bits, creating the proper size pilot hole should be a simple enough undertaking. If using #8 screws, use a #8 countersink bit. If using #10 screws, use a #10 countersink bit. And so on. However, things can sometimes get a bit murky because not all countersink bits – or wood screws – are created equal. For example, the photo below shows cross-section views of pilot holes drilled with three different types of countersink bits. The left-most hole was formed with a tapered bit, the center one with a bit that also forms the screw shank hole, and the third with a straight drill bit. (The threaded portions were formed by driving screws into each hole).
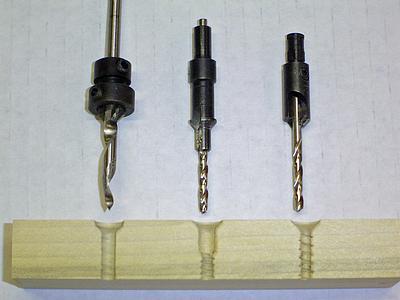
Profiles of different types of pilot holes
Note that bit number three only accommodates the threaded part of the screw. This bit is the type that is commonly packaged in those combination drill bit sets made by Sears, Ryobi, and others. I find that these bits work fine in softwoods but not so well in hard woods like oak because they make no allowance for the screw shank. The pilot hole formed with the center bit does a much better job because it offers ample clearance for the shank (although the shank portion could be a bit longer). The threaded portion of this hole provides lots of grip for the screw threads, although if the screw has a lot of taper to it – like old school wood screws do – some gripping strength will be lost. The pilot hole formed with the tapered bit does better in this regard. It not only provides sufficient clearance for the screw shank but also accommodates the tapered end of the wood screw (Sorry, I should have included a cross-section view of the complete pilot hole).
The photo below depicts how three different types of screws fit into each of the pilot holes. The screw in the middle is a classic wood screw with a thick shank and pronounced tapering threads. It fits snugly into the hole with the enlarged shank opening and would also fit into the the tapered hole on the left. The same is true of the screw in the tapered hole. This screw has a much thinner shank than the screw in the center hole even though both are marketed as wood screws. Neither of these screws would fit into the hole in the right. This hole is really only appropriate for a drywall screw, as shown. Note: these screws are just for illustrative purposes; in actual use, longer screws would be used

Matching the screw to the pilot hole
What if you don’t have ready access to countersink-pilot hole bits and need to drill some pilot holes? That’s when you pull out your collection of straight drill bits and consult a pilot hole table like the one shown below. There’s a bunch of these tables out there on the Internet. They’re based on the idea that the pilot hole should be just slightly smaller than the root diameter of the screw for hardwoods and 1/64″ smaller than this for softwoods. The “root diameter” is the inner diameter of the threaded portion of the screw just below the shank. I view these numbers as guidelines rather than as gospel. For example, when drilling a really hard wood like maple and using long screws, the pilot hole may be too tight if these figures are strictly adhered to. In this case, I would consider making the pilot hole slightly larger in diameter than the screw’s core diameter. There’s actually a woodworking rule of thumb for this: Hold the screw and the drill bit up to the light; for softwoods, pick a bit that’s the diameter of the root of the screw; for hardwoods, pick the next bigger bit size (typically 1/64″ larger).
A note on terminology: technically, the term “pilot hole” refers to the guide hole for the threaded portion of the screw but it’s commonly used to refer to the entire hole including the shank or clearance hole.
Wood Screw Shank and Pilot Hole Table
Once you’ve figured out the appropriate bit sizes, you’re ready to create the pilot hole. This requires three separate bits – one for the countersink, one for the screw shank, and one for the pilot hole (threaded portion of the screw). I prefer to start with the largest bit first and work down to the smallest. In other words, countersink first, followed by shank hole, followed by pilot hole.
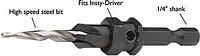
Insty-Bit countersink
Once you’ve done this procedure a few times, you’ll be ready to invest in a good set of countersink bits. An example of this is the the Insty Drive System. It’s basically a tapered countersink bit with a removable sleeve containing a screw driver bit. You drill the hole, slide the sleeve in place, and drive home the screw. Regardless of what set you buy, it’s always a good idea to pick up some extra bits.