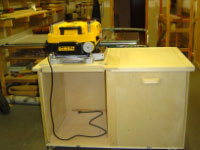
This is a project that got away from me. I started out to build a roll-around stand for a portable Delta planer. Nothing fancy, just a wooden box on wheels with the planer bolted to the top. Then I decided to add a swivel capability to the top so the planer could be flipped up when I wanted to use it and flipped down when not in use, leaving a handy work surface. Then, I eyed the flimsy outfeed table for my tablesaw and thought “hmmm, why not make the flip-top planer stand serve double-duty as a new outfeed table for the tablesaw?” No big deal, I’ll just make the stand a little larger to roughly match the footprint of the old outfeed table.
 Planer and spindle sander flipped up for use |
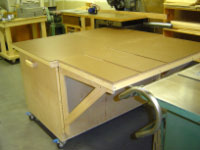
 Side view of tool stand / outfeed table |
But then I realized this would result in lots of unused space because the planer would only occupy about half of the outfeed table. So, I got the bright idea of building two flip-tops: one for the planer and one for an oscillating spindle sander. As I progressed down this path, I realized there needed to be slots in the table top to accommodate the sliding crosscut jig but it wasn’t feasible to cut them directly into the flip-top.So, I decided to add a flip-up front table with miter gauge slots. A removable masonite top was added to the main cabinet to create a uniform sliding surface. Then, handles were added to all four sides because the table was becoming somewhat heavy and difficult to maneuver around. And so it went…
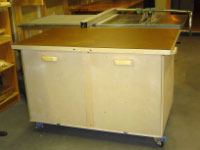 Completed unit with masonite cover |
 Outfeed table ready for business |
The end result was a tablesaw outfeed table / flip top planer-sander stand / workbench. It was bulkier than I intended – the top measures 35″ by 53″ (with the miter table folded down) and it weighs around 130 pounds. It takes a fair bit of effort to move it around. But overall, the stand/table makes better use of the limited space in my shop. In particular, the planer now resides in what was formerly dead space under the outfeed table freeing up floor space for other tools. And the spindle sander is more readily accessible because previously it was stored on a shelf in a room adjacent to the shop.
The flip-top design is partially based on plans for a flip-top work center from WOOD magazine. Each of the two flip tops is made from two pieces of 3/4″ plywood with 3/4″ yellow poplar “ribs” sandwiched between the plywood. A 5/8″ diameter steel rod passes through the middle and rests in holes drilled into the supporting side panels. The support holes are reinforced with pieces of solid red oak.
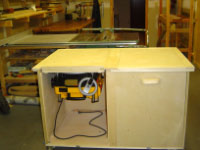 Planer retracted into cabinet base |
 Planer flipped up for use |
The top is covered with two removable panels of 1/4″ thick masonite to provide an easy slide surface. These panels were added because the flip-top does not lie perfectly flat relative to the edge pieces along its perimeter so a board being ripped could catch as it slid across the uneven surface. Setting up the planer for use involves removing the masonite top and the vertical panel. Then it’s a matter of swiveling the planer upright, which take a bit of elbow grease, and then rotating two metal tabs sideways to keep the flip-top in position.
The flip top is secured in position by metal tabs (The WOOD plans refer to these as “turn buttons”). They are basically 1/8″ thick by 3″ long pieces of metal that are secured to the flip top with a 1″ screw. The screw is left slightly loose so the tabs can be easily rotated into position. I should probably bulk up the mounting mechanism for these tabs, although most of the weight of the planer bears on the pivot rod in the middle of the panel so the tabs only carry a moderate load. When the top is swiveled so the tool is inside the cabinet, the metal tabs push up against wooden retaining bars on the front and back of the cabinet. These bars, one of which is screwed to the backside of the removable access panel, prevent the top from moving around. If you push down on one end of the flip top, the far side is prevented from moving up because the metal tab is forced against the retaining bar. Simple but effective.
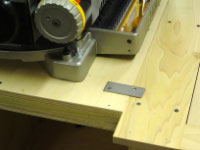 Top is held in position by pivoting metal tabs |
 Removable doors allow clearance for top to flip |
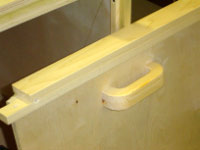
Wooden handles were fashioned from 6″ long laminated pine to facilitate moving the beast around and for removing the back panels. Although not shown, the panels are secured in place by two 1/4″ turn knobs that thread into threaded inserts near the left and right sides of the panel cap piece (that is, the top of each panel screws into the two top rails on either side of the flip top).
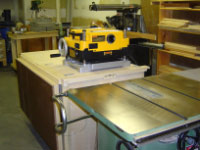
Let the surfacing commence. To use the planer in my relatively narrow workshop, the apparatus is turned sideways so boards can be fed in either from the front side or back side of the tablesaw. If fed in from the back side, the tablesaw surface can be impressed into service as an outfeed table — for the planer. How’s that for circular logic? In case you’re curious, the planer is a Delta DW735 model. It weights about 100 pounds, handles boards up to 13″ wide, and does a mighty fine job. It is equipped with handles on either side which come in very handy when flipping the planer into the upright position.
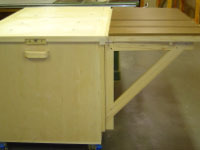
A 24″ wide flip-up extension table with miter gauge slots was added to handle cuts involving a miter gauge or cross-cut sled. This mini-table is connected to the main table by a 48″ long piano hinge. It is secured in the working position by two angle supports that rotate out and contact a support bar on the underside of the table. It’s hard to tell from the photo but this bar is tapered — as the angle support rotates further along the tapered bar, the outer end of the table steadily rises up. This mechanism provides some level of fine tuning the outfeed table height. When not in use, the angle supports fold in against the backside of the cabinet and the miter table folds down to the vertical position.
 Outfeed table folds down when not needed |
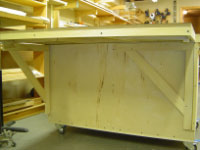 Outfeed table supports swing in to lower table |
This is exactly what I( need for my shop. PLS tell me more. Are there plans, cutlist, etc. available for this piece? Moorpark, CA
Plans are here: http://www.woodstore.net/plans/shop-plans/tool-bases-stands/2146-Flip-Top-Work-Center.html