I came across this letter and key rack in Issue #32 of Woodsmith and decided to make it the gift project for Christmas 2005. It seemed like a fairly simple “weekend” project and something that most anyone could use. Now, if I only made one of these racks, it would have indeed been a weekend project. However, I built ten of them (family + extended family + friends) so the weekend project became a 3-week project, working part-time during evenings and weekends.
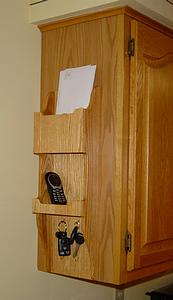
Red oak letter and key rack
As it turned out, Christmas arrived before I could get all the racks stained and finished, although I did manage to get them all assembled. And I learned a valuable lesson: either start earlier next time, pick a simpler project, or pare down the gift list!
Most of the units were 3-1/2″ deep, 5-1/2″ wide and 22″ high. I also made one slightly larger (pictured left) that was 7″ wide. This turned out to be a more practical size since there are so many over-sized letters in the mail now-a-days. The racks were mostly made from 4/4 red oak that was planed down to 7/16″ (yes, lots of waste but I put it to good use as mulch). One rack was made from yellow poplar which lends itself well to painting since this wood has a very subdued grain – kind of like white pine.
This project turned out to be fairly labor intensive because of all the ripping, planing, shaping, and other milling that was required. The sides have tongues cut into the front and back edges that fit into mating grooves in the front and back pieces. The sides also have dados to accommodate the upper and lower dividers (shelves). Although you can’t tell from the picture, the upper divider (where the letters rest) is angled upwards. It was a bit tricky to cut this angled dado compared to the other dado but I did manage to “get er done”.
The most time consuming part was cutting and smoothing the curved profile on the side pieces. First, they were cut to rough size on the band saw. Then they were trimmed to final size using a template made from 1/4″ masonite and a hand-held router with a pattern bit. Finally, the edges were sanded to remove any areas where the router bit burned the wood or otherwise did not cut cleanly. On some of the pieces, the router bit chipped out part of the tongue that fits into the groove on the backside of the face pieces so I had to repair these pieces as best I could. (Of course, by the last couple racks, I had things figured out so chipping was much less of an issue).

Letter/key rack made from yellow poplar
The front faces also involved rough cutting on the band saw followed by routering to final size and then sanding. Once all pieces were milled, it was a matter of gluing the fronts and backs to the sides. At this point, I discovered that some of the back pieces had cupped a bit — that’s what sometimes happens when you’re too aggressive about creating thin wood from thicker wood. In retrospect, what I should have done was plane the wood down to 5/8″ or so, given it a few days to do its warping thing, and then do the final jointing and planing. In any case, most of the cupping problems went away when the pieces were glued together but a couple pieces had to be re-milled because the cupping was so severe. Live and learn…
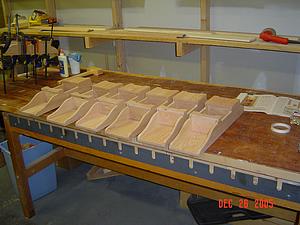
Letter and key rack assembly line
For key hooks, I used 3/4″ brass plated “hooks & eyes” from the local Home Depot. These are inexpensive and worked ok but I had to snip back the hook a bit to make it easier to hang and remove keys. (I would have preferred to use brass hooks like the ones in the Woodsmith article but couldn’t find them anywhere).
To mount the letter and key rack, I drilled a small countersunk hole into the top and bottom of the rear piece so the unit could be screwed to a wall.