Concept sketching is a free-wheeling type of informal drawing that helps you flesh out the basic design of an object before advancing to the more exacting scaled drawings. The essence of sketching is simple: draw whatever pops into your mind, revising as you go until you find a design you like best. With a little practice, you might even find sketching to be fun.
Preparing to sketch:
The tools of the trade are simple: a medium soft lead pencil (#2 or so), an eraser, (you’ll be doing lots of erasing), and white paper. Some folks like to use a bound spiral notebook because the pages remain intact and are easy to browse through for later reference. Plain old printer paper works fine for me. Beginners may prefer lined paper.
Don’t tape the paper down to a table or board – it is easier to draw straight lines and graceful curves when you can move the paper rather than the angle of your hand.
Translucent paper such as Vellum is handy for tracing purposes once you’ve settled on a basic form and wish to create different versions of it.
The sketching process:
Begin by lightly drawing an outline of the object. Choose a perspective or surface that best represents the object as the eye sees it. Generally this will be an oblique view that includes the front, one side, and the top. The idea here is to to see if the basic form looks OK to you. Don’t get too hung up on proper proportion, neatness, or smooth lines – plenty of time for that later.

Once you’re satisfied with the basic form, experiment with different design details by making a series of “what-if” prototype sketches. Keep your lines light to make it easy to erase. As you hone in on a design that you like, you can gradually darken the lines. Remember to grip the pencil lightly and keep your wrist flexible.
To draw a straight line, keep your eye fixed on the point where a line should end and move the pencil toward it. You can also rotate the paper to get the most comfortable hand angle. As a right-hander, I find it easiest to draw straight lines using a left to right horizontal sweeping motion rather than a vertical movement. For longer lines, you’ll want to move your arm as well as your hand.
To draw a circle, lightly mark the center and four radius points and then draw curved lines between the radius points. A similar approach can be used to draw curved lines.
Don’t overdue it – it is often better to work for short periods of time and then come back with a fresh eye (and attitude).
If you’re having trouble getting the darn thing to look like something recognizable and you have a picture of an object that is similar to what you’re trying to design, cheat a little bit. Trace over the basic outlines of the object and then fill in your own details.
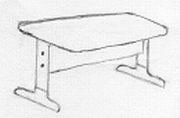
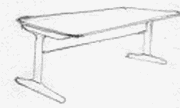
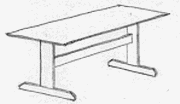
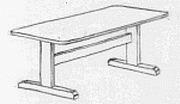
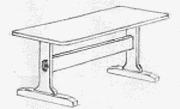
Just for fun, I created some design variations of the trestle table shown above using a graphics program named Paint Shop Pro.
